When I first went walleye fishing on Lake Kabetogama in 1972, I quickly learned that the method used there to fish was quite different from what I had previously known. The resort owner told us that we needed to “use a heavy sinker above the snap swivel and bump the bottom with a long leader”.
Snells or Lindy Rigs?
I later learned that this was a simple “Lindy Rig”. The first leaders – called snells – that I bought, at that time, were only $0.59 each. Years later, a friend showed me the way to tie my own snells. I’ve saved a ton of money since then. Tying on the hook is easy. After that, you can get as fancy as you want (by adding beads, spinners, etc.), in order to entice those ‘eyes to bite!
I use 10- to 12-pound test, monofilament line for my snells. Note: this knot will not hold with Fire Line®. If you want to use Fire Line® for your snells, a knot called a Palomar knot needs to be tied on that type of line.
The hook is probably the most important part of the “rig”. I’ve started using a Gamakatsu® #8 as my hook of choice. It’s razor sharp and the hook-set is quick and clean. You won’t miss many strikes when using this hook!
In the photos that follow, and for the purpose of illustration, I’m using a fairly large hook and line here. However, it really doesn’t make much difference, since the process is always the same. The specific instructional text immediately follows each picture.
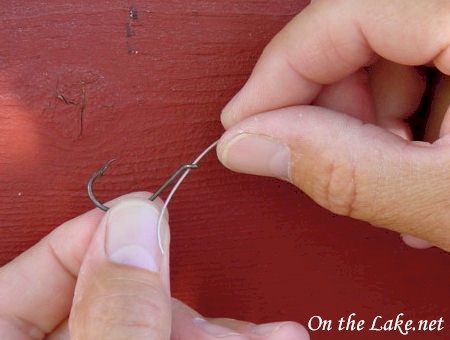
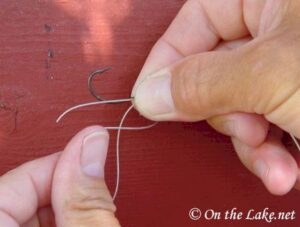
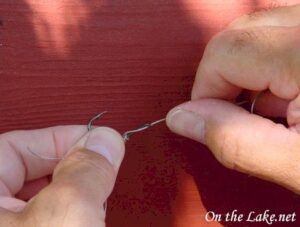
Step 1
Start by inserting the line down through the front of the eyelet. Pull an extra several inches of line through the eyelet.
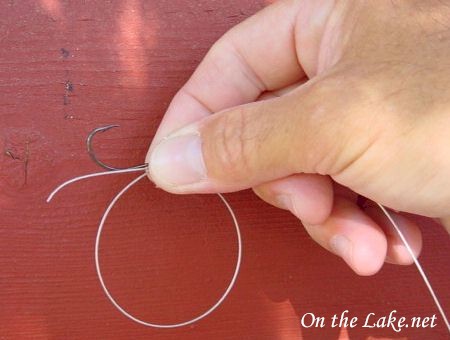
Step 2
Holding the line and shank just below the eyelet with your right hand, grab the end of the line with your left hand and make a counterclockwise loop that is about 2-3 inches in diameter. Make sure to leave about an inch or so of line sticking out beyond the hook.
Step 3
Now comes the only tricky part. Using your left thumb, index and middle fingers, wrap the right side of the loop over and around the hook shank and also over the cut end of the line. The thing that makes this difficult is that the line will have been twisted during this process. It is imperative to not let go of the line. The twist is important to the knot itself!
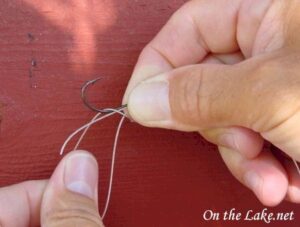
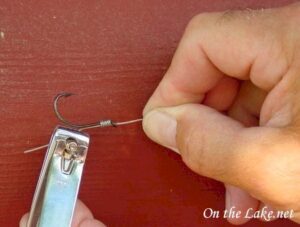
Step 4
You’ll want to make a total of six to eight loops over the shank, each time making sure to take the right side of the loop and wrap it over the hook shank and the end of the line. The loop you started with will be smaller now, and twisted. This makes it harder to hold.
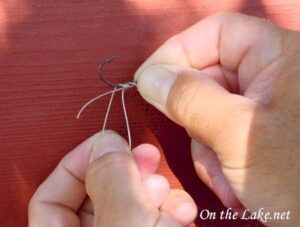
Step 5
Holding the line and shank – as well as the cut end – securely with your right hand, pull the cut end of the line straight out until it is fairly tight.
Step 6
Finally, holding the hook and wrapped line now with your left hand…
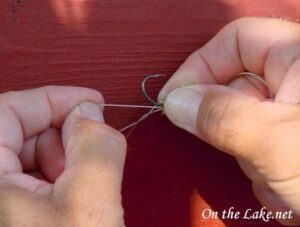
Step 7
Use your right hand to quickly pull the other end of the line back through the eyelet and… Voila – your very own snell!
Step 8
Trim the excess line from the tag end; cut to any desired length. You can easily add beads, spinners, clevis pins and anything else you want to achieve the presentation you desire for every type of bait, fish and water condition.
Note: This method takes a little practice before you achieve perfection, but the result is every bit as good as you would find in a “store bought” snell from the name brand companies.
By the way, these manufactured snells now cost, depending on style, spinners, beads, etc., anywhere from $2.79 to as much as $6.99 or more – each – depending on the type!
Good luck, and I’ll see you on the lake!
rk